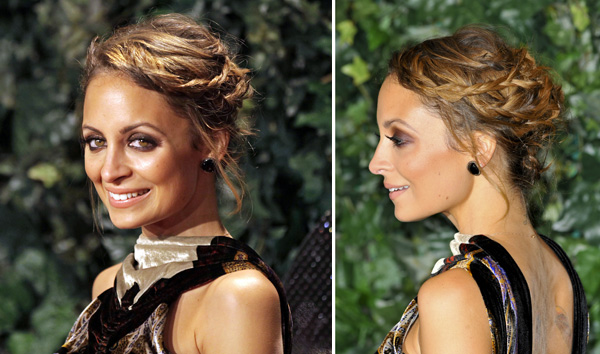
We have a total crush on Nicole Richie's chic 'do. Find out why in this week's installment of Celeb Hairstyle of the Week!

Nicole Richie always seems to exude a super casual bohemian vibe with her style. Her fashion choices always look quite effortless, but Nicole's hair is something I also love to watch. Recently, the designer and mom rocked this glam updo at an event, and I can't get it out of my head!
I turned to celeb stylist Brian Magallones to get the scoop on recreating this red carpet-ready look at home!
Get the look
"I love this boho goddess look on Nicole Richie. It's great because it's a look that can go directly from the classroom to the red carpet. It's great for any texture hair and easy and fun to do."
- One of the main things about this style is that it looks messy and undone. Less if definitely better than more in this case, and it's all about texture. If you have curly or wavy hair, you don't need to blow it straight first — your natural texture will work just fine.
- If starting with wet hair, simply rough dry the hair to get the moisture out. Before drying, apply a volumizer at the roots to get body. My favorite is Aveda Volumizing Tonic.
- Once the hair is completely dry, section the front of the head from the back of the head, from ear to ear. Secure the back section by twisting up random pieces and securing with bobby pins. Again, the goal is to look undone, so it doesn't have to be perfect. For a variation on the style, you can also put the back section in a ponytail or messy bun.
- For the front section, do a deep side part, and create a few braids. Depending on the thickness of your hair, on the heavy side of the part, make two or three braids, and on the other side of the part, do one or two braids. The braid only needs to be long enough to reach the back of your head, so braid about eight inches, and then secure with a clear elastic, leaving the ends out. If your hair is not long enough for this, you can simply clip in or glue in some longer extension pieces, and braid them in along with your own hair. This is also a fun way to add cool colors if you want to get creative.
- Once your hair is braided, working from the back to front, start incorporating sections into the back, using hairpins to secure. Leave the braided sections for last so that the braid is more exposed, and be sure to keep some pieces out around the hairline to frame your face.
- Finish with hairspray and lots of shine spray which helps to highlight the texture. My favorites are Aveda Control Force Hairspray and Aveda Brilliant Spray on Shine.
More celebrity hairstyles
Celeb Hairstyle of the Week: Adele
Celeb Hairstyle of the Week: Mila Kunis
Celeb Hairstyle of the Week: Nina Dobrev