Sally Hansen's Limited Edition Halloween nail collection

Sally Hansen has come out with a new holiday-inspired mini-collection that's sure to appeal to festive fashionistas.
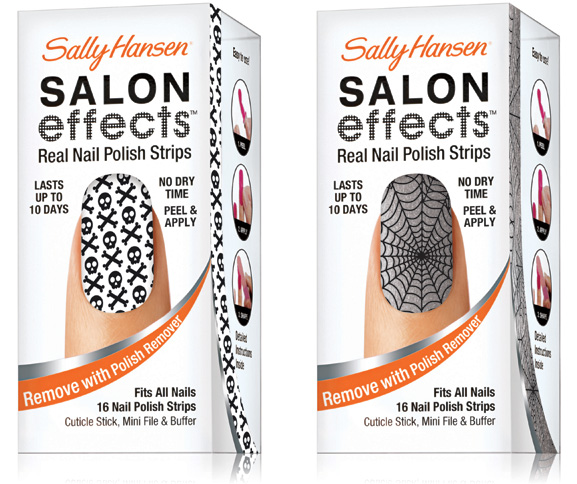
Sally Hansen stayed away from Halloween nail clichés and created nail appliqués that are simple and graphic. The nail design collection includes the following shades: How Corny, Batty For You, Patch-O-Lanterns, Numbskull and Spun For You.
Patch-O-Lanterns features illuminated-looking pumpkin faces in the traditional orange and black colors while Batty For You plays up a vibrant purple that could be straight from the set of a haunted house. Spun for You and Numbskull are more understated and give off a creepily seductive charm.
Sally Hansen's Halloween Salon Effects Real Nail Polish Strips are easy to apply and remove, so you'll have time to try out all five nail designs before Halloween night. The collection is available now and will only be sold for a limited time at drug and retail stores such as Target, CVS and ULTA for $10 each.
Dashing Diva DesignFX nail appliques

Dashing Diva has also come out with a limited edition set of three Halloween nail designs! Made up of three different spooky-chic prints and colors, the collection can be worn throughout the Halloween season as a fun addition to your wardrobe or on Halloween night to flawlessly finish off your costume.
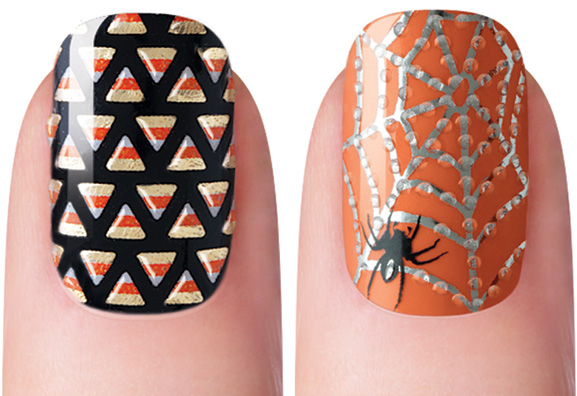
Their Halloween Treats Collection includes: ColorFX Bete Noir, a deep haunting black, Enchanted Spice, a black background adorned with colorful candy corns, and Model Webizen, an orange backdrop with a silver spider web and tiny black spider dangling in the corner.
A DesignFX salon manicure will last up to a week on natural nails, and up to two weeks when paired with a gel overlay like Dashing Diva Gelife. The gel overlay adds a super high-gloss shine with an embedded dimensional finish. It also can be adapted for nails or for toes!
Dashing Diva DesignFX Halloween appliqués are available at participating Dashing Diva nail spas and salons nationwide. Treatments for DesignFX start at around $35 and up for natural nails and approximately $55 and up with a Gelife overlay. For more information, please visit designfx.dashingdivapro.com.
Up next: Halloween nail polish designs >>
{pageBreak}

Trick out your nails
Just in time for Halloween, we've rounded up some frighteningly cool nail designs that you can do at home! Whether you like stick on nail appliqués or traditional polishes, we have everything you need to trick out your nails by October 31!
Jack-o'-lanterns
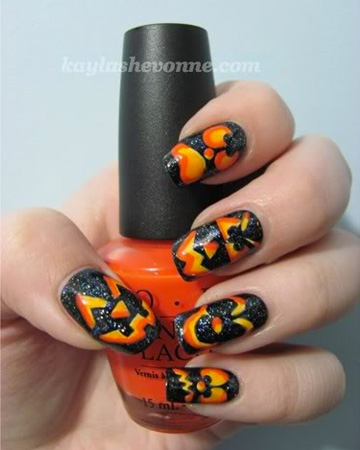
Want to give your nails a spooky, illuminated look? Then try this fun mani!
To recreate this look, you will need:
- Basecoat and topcoat of choice
- Black creme polish
- Sheer iridescent glitter topcoat
- White creme polish
- Light orange-yellow creme polish
- Medium orange creme polish
Instructions:
- Apply your basecoat and let dry.
- Paint all of your nails with your black creme polish.
- Paint one coat of your sheer glitter topcoat over your base color.
- Using your white creme polish and your detail brush, freehand two large triangles near the base of your nail, leaving a small space in between them. These will serve as the eyes. Directly below that, add an upside down triangle for the nose and a wide smile for the mouth.
- Fill in all of the white areas with your light yellow-orange polish.
- Using your black creme and your detail brush, go back and start with the smaller details. First, at the base of both of your large triangles, draw a small triangle. Next, at the top of the smile, freehand two small squares with your black polish. Make sure they're not too close together. Then make another at the bottom of the smile.
- Since we covered up some of our glitter throughout the detailing process, use your detail brush and your sheer glitter polish to fill in any black spaces that are without glitter.
- To give the Jack-o'-lantern a lit-from-within look, take your detail brush and your medium orange polish and outline the details on the face.
- After allowing your design to dry completely, add a layer of your favorite topcoat. This will make your new mani last longer. It will smooth out any bumps and ridges that have been created during the process and will also give your nails a nice shine.
This design was created by Kayla Shevonne of Nails by Kayla Shevonne. Visit her blog for more amazing nail ideas and tips!
Graphic eyeballs
If you're looking for a manicure that's a little more sci-fi, then this one's for you!
To recreate this nail design, you will need:
- Basecoat and topcoat of choice
- Burgundy polish for the base
- White polish with a round brush
- Red jelly polish or similar sheer polish
- Polishes for eye colors
- Black polish
- A small nail art brush
- A large dotting tool, a small dotting tool and a tiny dotting tool
- Cleanup tools: a makeup brush or Q-Tip, acetone or remover
Instructions:
- Apply your basecoat to your nails. Let it dry.
- Add big white dots to the nail by dotting them on using the polish's brush. If the polish you are using has a flat brush like OPI's, you may want to apply your white with a large dotting tool or nail art brush. The dots look best if you apply them so that there are white dots partially off the sides of the nail, to keep the pattern looking infinite.
- Using a small nail art brush, paint on some eyeball veins with your red polish. The sheer-factor of the polish keeps the red from being too distracting.
- Use the large end of your dotting tool to apply dots of your first eye color in the middle of the white dots.
- Repeat step four with your second and third eye color.
- Use the small end of your dotting tool to apply the black pupils of the eyeballs in the middle of the colored dots. Use a light touch when applying so the black doesn't spread too wide and cover your colors.
- Use a tiny dotting tool or a toothpick to apply the white highlights to the eyes . Don't center them in the black. Instead, place them at the top right of the black and colored dots.
- Clean up the extra polish on your fingers and cuticles. Let your nails dry for a bit, and apply your topcoat of choice to seal and protect the look.
This, and other awesome nail designs, can be found over at Chalkboard nails. She also has made a great diagram to seamlessly take you through this look from start to finish.

Funny bones
Who doesn't love a cheeky dancing skeleton?
To recreate this look, you will need:
- Orange polish
- Black polish
- Bundle Monster plates BM224 and BM223
- White acrylic paint to freehand the skeleton
Instructions:
This nail design has a big impact but won't take you too long thanks to Bundle Monster nail stamps! When freehanding the skeleton, there's no need to be perfect. Just make sure that the top and bottom halves line up, and you're good to go! For more fun nail designs head over to The Nailsaurus.
Watch: How to use Bundle Monster nail stamps
Learn how to stamp nails with rhinestones in this video.
Learn how to stamp nails with rhinestones in this video.
More nail tips
Nail art trends we can't wait to try
Fall nail colors with a major wow factor
DIY collar nails tutorial

