Not everyone has time to do a different design on each nail, but I hope this tutorial will inspire you to try something new. Let's get started! Remember, you should always start your manicure with a base coat to protect your nails.
Spidey sense (index finger)
Supplies:
- Base coat: Dazzle Dry Base Coat
- White: OPI Alpine Snow
- Black: OPI Black Onyx
- Red: Dazzle Dry Rapid Red
- Top coat: Dazzle Dry Top Coat
- Trick n Treat Halloween Sticker Combo Pack from Whats Up Nails
- Small dotting tool
- Needle
Directions:
Step 1: Apply a base coat and a very thick layer of white nail polish.
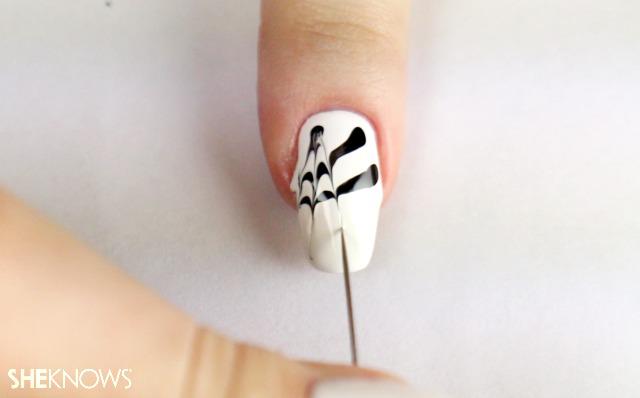
Step 2: Add a black dot and two black lines using a small dotting tool.
Step 3: Use a needle and drag it through the nail polish while it is still wet to create the spider web design.
Step 4: Clean the cuticle around your nail by using a brush dipped in non-acetone or acetone nail polish remover. Acetone works better but can dry your skin.
Step 5: Take a big dotting tool or the tip of a bobby pin and create a red dot in the center of the web. You can apply several layers of red nail polish to make this dot stand out.
Step 6: Let the design dry completely.
Step 7: Put a spider sticker in the empty white space and push it into the nail to make it stick completely.
Step 8: Apply top coat.
Bats over a moonlit forest (middle finger)
Supplies:
- Base coat: Dazzle Dry Base Coat
- Black: OPI Black Onyx
- White: OPI Alpine Snow
- Makeup sponge
- Yellow: Dazzle Dry Sahara
- Glitter from Amazon
- Top coat: Dazzle Dry Top Coat
- Masking or Scotch tape
- Trick n Treat Halloween Sticker Combo Pack from Whats Up Nails
Directions:
Step 1: Apply base coat and then paint nails with black nail polish.Wrap your finger with masking or Scotch tape for easy cleanup.
Step 2: Apply white and black nail polish to a makeup sponge. New/thin polish works best.
Step 3: Once your base coat is completely dry, lightly dab the sponge on your nail to create an ombre effect, as seen below.
Step 4: Remove the tape and clean your skin around the nail using a Q-tip and brush dipped in non-acetone (better for the skin) or acetone nail polish remover.
Step 5: Create a moon using yellow nail polish; apply several layers to achieve a brighter moon. For an even brighter yellow, apply a layer of white nail polish underneath.
Step 6: Add drops of clear nail polish above the moon and add some glitter on the top of it to imitate stars in the sky.
Step 7: Add two bat stickers on top of the moon and sky.
Step 8: Use a detail brush and add a back lit forest in your moon.
Step 9: Apply two top coats.
Helpful tip: I did two layers of ombre for this mani. Sometimes one layer is enough if your nail polish is well-pigmented. But, sometimes you need to do 3 layers to achieve the result you want. Usually higher-quality nail polishes have better pigmentation which means they will work better for ombre.
Dripping blood (ring finger)
Supplies:
- Base coat: Dazzle Dry Base Coat
- White: OPI Alpine Snow
- Red: Dazzle Dry Rapid Red
- Top coat: Dazzle Dry Top Coat
- Trick n Treat Halloween Sticker Combo Pack from What's Up Nails
Directions:
Step 1: Apply base coat and 2 layers of white nail polish.
Step 2: Let it completely dry. You can use fast-drying top coat to make it dry more quickly.
Step 3: Apply a dripping blood stencil on the tip the nail. Tweezers work well for this.
Step 4: Press the stencil onto the nail to make it stick evenly. This will help prevent leaking nail polish under the stencil.
Step 5: Apply red nail polish over the stencil and peel the stencil off immediately afterward for clean lines. Use new or thinned nail polish for better results.
Step 6: Let the design dry completely before you apply your top coat.
Sparkly pumpkin (pinky finger)
Supplies:
- Base coat: Dazzle Dry Base Coat
- Black: OPI Black Onyx
- Glitter from Amazon
- Top coat: Dazzle Dry Top Coat
- Trick n Treat Halloween Sticker Combo Pack from What's Up Nails
Directions:
Step 1: Paint nail with black nail polish.
Step 2: Add a pumpkin sticker and push it to the nail to make sure it sticks.
Step 3: Add glitter around the pumpkin while the base polish is still wet. Remove excess glitter with a brush.
Step 4: Wait until the polish has dried and then apply two top coats.


